But even when I'm struggling for ideas, old photos are in plentiful supply, so I figured I might as well share another moth. This one wasn't quite as spectacular as the Big Brown Moth that I shared back in May, and if memory serves me correctly it was a lot smaller, but I like the way this photo came out too.
Monday, 18 July 2016
Another Moth
I finally finished the job of moving my bonsai blog to its new domain last night, but in the process I've been neglecting this one. Although I suffer terribly from writer's block, I'd be lying if I said that the problem was entirely a lack of inspiration. I can be terribly lazy too.
But even when I'm struggling for ideas, old photos are in plentiful supply, so I figured I might as well share another moth. This one wasn't quite as spectacular as the Big Brown Moth that I shared back in May, and if memory serves me correctly it was a lot smaller, but I like the way this photo came out too.
Labels:
black and white,
close-up,
insects,
macro,
moth,
photography
Thursday, 14 July 2016
Weeds in Black and White
Lately I find that I can't stay away from black and white when editing my photos.
This was a photo of some weeds I shot a while back. The flowers were actually yellow, but they stand out against the background so much better this way.
If you click on the photo to see a larger version you may be able to see that the flower on the left was covered with ants.
Linking up with Floral Friday Fotos and Saturday Show Off.
This was a photo of some weeds I shot a while back. The flowers were actually yellow, but they stand out against the background so much better this way.
If you click on the photo to see a larger version you may be able to see that the flower on the left was covered with ants.
Linking up with Floral Friday Fotos and Saturday Show Off.
Labels:
black and white,
close-up,
flowers,
Noir,
photography
Wednesday, 13 July 2016
Fantasy Island
Many of the photos I've edited for this blog so far have created illusions while still bearing some resemblance to reality. Today I went for something totally different.
The "island" in this image is actually part of a leaf.
Labels:
digital art,
editing,
fantasy,
photography,
seascape
Tuesday, 12 July 2016
Looking for Inspiration
It was never part of my plans to spend a large chunk of the day watching YouTube videos, but after stumbling across one entitled How Do I Develop My Own Style? I just got carried away as the suggestions for interesting photography videos were all so interesting.
Finally I got dragged into some really quirky stuff involving double exposures and prism use to create some really interesting effects in camera.
It was at that stage that I was reminded of this photo I took way back in 2014.
Despite appearances to the contrary, the only editing I did on this photo was a quick black and white conversion. And no, it wasn't a double exposure! I actually used a multi-image filter screwed into the front of my lens.
It's been a while since I've done anything like this, but perhaps all those videos have been the wake-up call I needed to push myself a bit harder in creating some really wacky photos.
Linking up to Wordless Wednesday.
Finally I got dragged into some really quirky stuff involving double exposures and prism use to create some really interesting effects in camera.
It was at that stage that I was reminded of this photo I took way back in 2014.
Despite appearances to the contrary, the only editing I did on this photo was a quick black and white conversion. And no, it wasn't a double exposure! I actually used a multi-image filter screwed into the front of my lens.
It's been a while since I've done anything like this, but perhaps all those videos have been the wake-up call I needed to push myself a bit harder in creating some really wacky photos.
Linking up to Wordless Wednesday.
Labels:
black and white,
distorted,
fantasy,
Noir,
people,
photography
Monday, 11 July 2016
Grasshopper Noir
I've been procrastinating horribly with moving the last of my bonsai posts to their new domain, but over the last couple of days I've decided to get the work finished once and for all so that I can turn my attention to working on my trees and writing new posts.
What's been slowing me down is the need to change the watermarks on my photos. While working on that a little while ago, I decided to experiment with the photo I used in a post titled A Visitor to the Bonsai Garden.
The post is about a beautiful grasshopper that I discovered on one of my trees a few months ago. He was quite the most colourful grasshopper I've ever seen, and yet when I opened that photo today I couldn't help wondering what it would look like in Noir.
I really liked the result, but I felt it was a little too quirky for that blog. If you'd like to see what he looks like in colour, you can see him there. There's a video too!
Linking up with Nature Notes, Black and White View and The Weekend in Black and White.
What's been slowing me down is the need to change the watermarks on my photos. While working on that a little while ago, I decided to experiment with the photo I used in a post titled A Visitor to the Bonsai Garden.
The post is about a beautiful grasshopper that I discovered on one of my trees a few months ago. He was quite the most colourful grasshopper I've ever seen, and yet when I opened that photo today I couldn't help wondering what it would look like in Noir.
I really liked the result, but I felt it was a little too quirky for that blog. If you'd like to see what he looks like in colour, you can see him there. There's a video too!
Linking up with Nature Notes, Black and White View and The Weekend in Black and White.
Saturday, 9 July 2016
The Wimbledon Beanie
I tend to watch a lot more television than is good for me, but I try to use my viewing time constructively by knitting while I watch.
Lately I've been knitting a lot of beanies for charity. I like to vary them a bit to keep from getting bored, but I also need to keep it simple so that I don't need to look at what I'm doing.
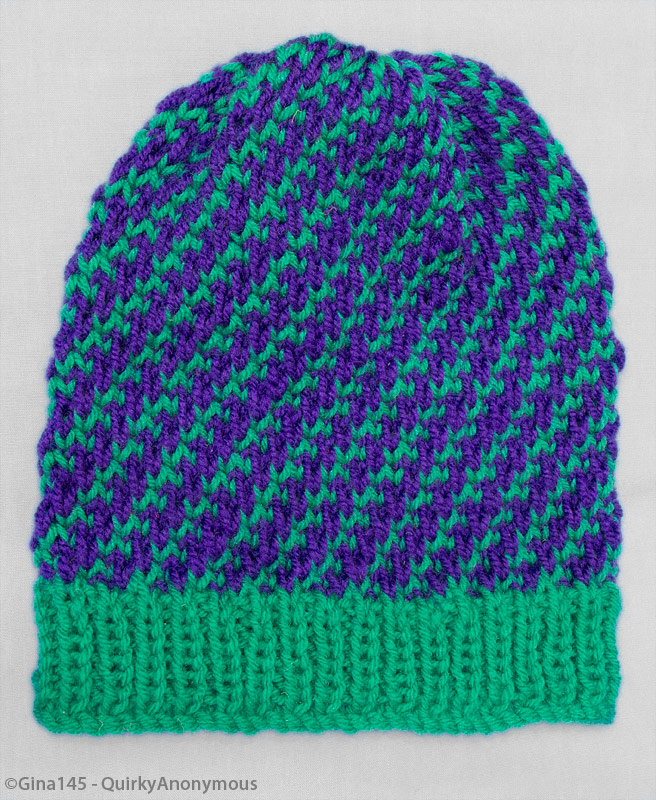
This is one I completed a couple of days ago.
I call it the Wimbledon Beanie because of the colour scheme. Had I not been watching the tennis when I started this one, I doubt I'd have put green and purple together.
I was really pleased to get the spiral effect with very little effort, so I thought I'd share the stitch for anyone who's interested in making a similar beanie for themselves.
As I work on a circular knitting needle to avoid sewing (my pet hate), all rows are knit.
Row 1,3,5: using purple - knit
Row 2: using green - *knit 2, slip 1 purlwise*, repeat until last stitch, knit 1
Row 4: using green - knit 1, *slip 1 purlwise, knit 2*, repeat to end
Row 6: using green - *slip 1 purlwise, knit 2*, repeat until last stitch, slip 1 purlwise
My basic beanie pattern is pretty straightforward. In this case I used double knit wool and a 7.5mm needle, so I cast on 70 stitches, but I vary the number of stitches based on what thickness of wool and needles I'm using. When going for the spiral effect, the important thing for a seamless transition between rows is that the number of stitches should be a multiple of 3 + 1.
I don't recommend using chunky wool for this pattern though as I tried it and the spiral effect got lost.
I started out with 6 rows of rib (knit 1, purl 1) before changing to the pattern. The number of stitches remains constant until I reach the required length - approximately 20cm (just under 8 inches). My only shaping is one decrease row: *knit 2 together*, repeat to end.
I don't cast off, but simply cut the wool, leaving a long enough tail to pull through all the stitches. I then knot the end and sew a few inches of the remaining wool into the wrong side to prevent the knot from coming undone.
And that's it.
Linking up with Nifty Thrifty Sunday.
Lately I've been knitting a lot of beanies for charity. I like to vary them a bit to keep from getting bored, but I also need to keep it simple so that I don't need to look at what I'm doing.
This is one I completed a couple of days ago.
I call it the Wimbledon Beanie because of the colour scheme. Had I not been watching the tennis when I started this one, I doubt I'd have put green and purple together.
I was really pleased to get the spiral effect with very little effort, so I thought I'd share the stitch for anyone who's interested in making a similar beanie for themselves.
As I work on a circular knitting needle to avoid sewing (my pet hate), all rows are knit.
| Circular needles available at Amazon http://amzn.to/29vFTWq |
Row 1,3,5: using purple - knit
Row 2: using green - *knit 2, slip 1 purlwise*, repeat until last stitch, knit 1
Row 4: using green - knit 1, *slip 1 purlwise, knit 2*, repeat to end
Row 6: using green - *slip 1 purlwise, knit 2*, repeat until last stitch, slip 1 purlwise
My basic beanie pattern is pretty straightforward. In this case I used double knit wool and a 7.5mm needle, so I cast on 70 stitches, but I vary the number of stitches based on what thickness of wool and needles I'm using. When going for the spiral effect, the important thing for a seamless transition between rows is that the number of stitches should be a multiple of 3 + 1.
I don't recommend using chunky wool for this pattern though as I tried it and the spiral effect got lost.
I started out with 6 rows of rib (knit 1, purl 1) before changing to the pattern. The number of stitches remains constant until I reach the required length - approximately 20cm (just under 8 inches). My only shaping is one decrease row: *knit 2 together*, repeat to end.
I don't cast off, but simply cut the wool, leaving a long enough tail to pull through all the stitches. I then knot the end and sew a few inches of the remaining wool into the wrong side to prevent the knot from coming undone.
And that's it.
Linking up with Nifty Thrifty Sunday.
Friday, 8 July 2016
A New Direction
When I started this blog my intention was to share a photo every day.
As I can sometimes go days at a time without taking any photos, this meant that I would often need to go digging into my archives for interesting shots, then editing them to look their best here. Some days it was fun, others it just felt like hard work. Committing to doing something every day regardless of whether I could spare the time or not was clearly a mistake.
At the same time I sometimes feel that I want to write about things that aren't related to my photos. As I already have a second blog focusing on my bonsai trees, I didn't want to commit to any more.
For a while I toyed with the idea of giving up on this blog and starting a new one from scratch, but I felt that doing so would be wasting the time and effort I'd already put into this one. I actually quite like some of my posts though there are a few that I may delete in time.
This post marks a new direction for my blog, and with it a new name. I'll try to keep it quirky :)
Linking up with The Ultimate Rabbit Hole and The Weekend in Black and White.
Labels:
beginning,
black and white,
Noir,
photography,
signs
Subscribe to:
Posts (Atom)